
At Record Evolution, we want to enable industrial companies to access and analyze data from any machine or device. We want manufacturers to continue to make use of their legacy equipment. But even more so, we want industrial enterprises to be able to make any device ready for the Internet of Things, including cross-generation machinery and IoT devices by different vendors.
This is why we have built an IoT development platform that works with any machine. Retrofitting becomes easy and accessible. Working with heterogeneous systems or in brownfield environments is no longer the quandary it used to be. Thanks to container technologies, we are able to offer an IoT development platform that is truly hardware-agnostic.
To illustrate how it all hangs together, we have prepared this short article. In what follows, you will see how we connect a self-made vacuum pump prototype (our brownfield device) to the Record Evolution platform, install a data collection app from the IoT app store on the device, and set up an analytical environment (data pods) where you can load, analyze, and visualize your incoming data.

Specifically, this involves the following milestones:
- Connecting the vacuum pump to a Raspberry Pi to serve as our IoT device;
- Adding the IoT device to a device swarm and connecting it to the IoT platform using the Record Evolution Reflasher;
- Using the cloud IDE to build a data collector IoT app OR using the platform’s IoT app store to retrieve a ready-made data collector IoT app and install it on the device;
- Stream the incoming data into a data pod;
- Analyze the data and visualize the results using the data pod’s infographics panel.
In this sense, the vacuum pump prototype is used to offer a concrete answer to concrete conditions in a concrete industrial environment. And it builds a bridge between the platform’s capabilities and concrete industry needs.
Sketching Out the Prototype and Defining Its Basic Capabilities
In this section, we introduce you to the initial sketches used to build the prototype with a vacuum pump. The vacuum pump model sketch includes sensors, a Raspberry Pi, and the vacuum bell jar from which to extract the air. This prototype had to be small and portable, with various sensors whose readings are recorded and transferred to the Record Evolution platform.
The prototype was built from scratch using this basic design:

The prototype includes a Raspberry Pi 4 that we use to connect the vacuum pump to the Record Evolution platform and read out data. Also, the prototype is powered by a 12V battery and is equipped with various sensors. The attached sensors measure vacuum, motor speed, current, voltage, ambient temperature, and motor temperature.
Getting Started: Building the Prototype
So let’s get a glimpse of how the prototype was built. Below are some snapshots of the process:
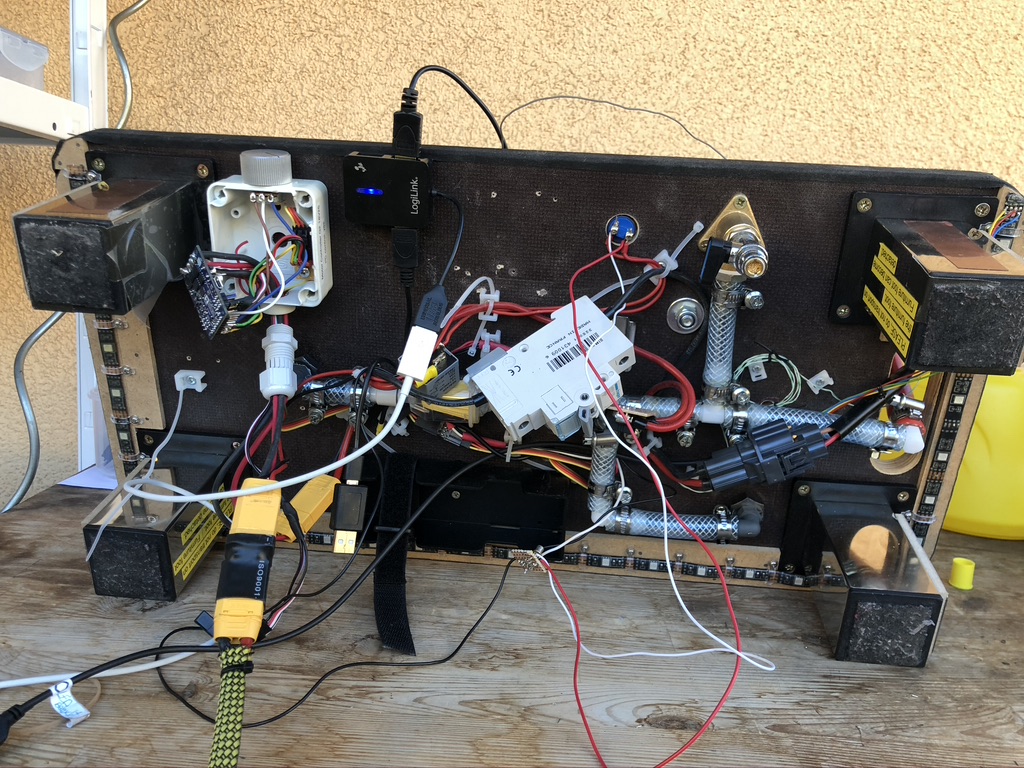

Sensors, Circuit Board & Raspberry Pi
The sensors for the vacuum, the motor temperature, and the ambient temperature are mounted on the upper side of the prototype.
The control for the solenoid valve, the error lamp as well as the sensor technology for measuring the current, the voltage, and the evaluation electronics for the speed are located on a circuit board on the bottom side of the prototype.

The communication with the Raspberry Pi is done via the I2C bus using GPIO pins. Our Raspberry Pi sends the data to the Record Evolution platform where it is stored in a data pod’s raw table.
Determining the Voltage Source
A non-hazardous voltage source was needed: an AGM motorcycle battery, transportable, combined with a small constant voltage power supply. Again, everything had to be designed and built adequately to prevent operating errors.

The Overall Setup
Below the vacuum bell jar is a plastic block mounted on small pads. The block reduces the volume of air inside the bell jar. As a result, higher vacuums are generated more quickly. At the same time, the surface of the plastic block also serves as a presentation table. Small pads on the bottom of the plastic block provide the necessary distance to the base plate so that the air inside the bell can be extracted.
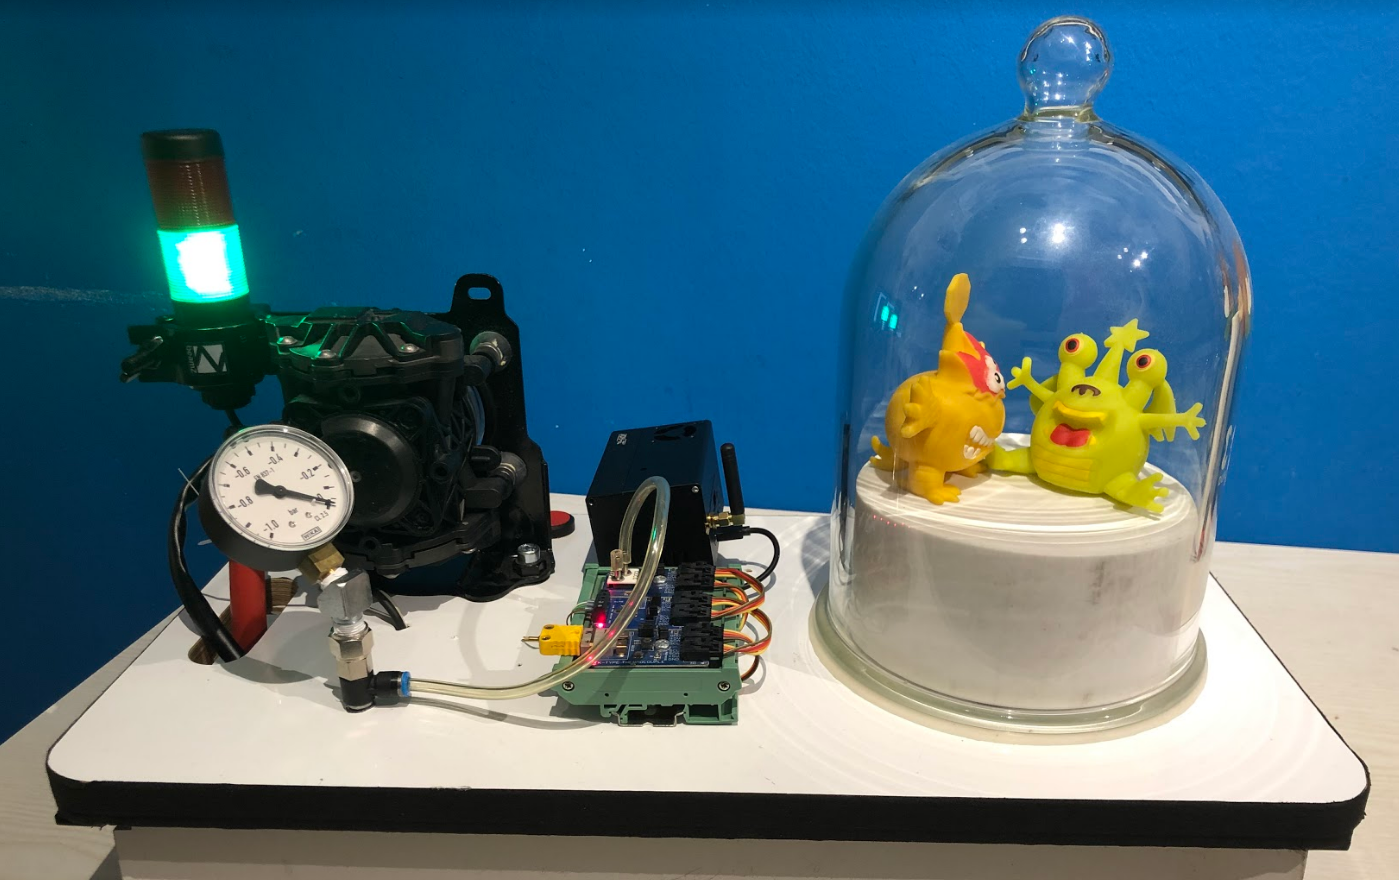
A manual pressure gauge allows the operator to check the measured vacuum.
A drain valve on the underside of the base plate can be used to simulate a failure in the pump. Thanks to the installed IoT app, in the event of a malfunction, the app turns on the error light and stops the pump. However, the app remains on and the pump can be restarted after clearing the error.
The pump itself is controlled by a motor controller. The initial relay solution was discarded because a relay makes a noise every time it is switched.
And then several calculations had to be made. What is the starting current of the pump at different pressures? What amount of energy is taken from the battery per load case? And what cable cross-sections are required? How do we protect the Raspberry Pi from low voltage?
Connecting the Device to the Platform and Building the IoT App
Next, we need to create the foundation for accessing and controlling the device via the Record Evolution platform using a simple internet connection.
To trace the process, sign up to the platform.
Forming a Device Swarm and Establishing a Connection
From your homepage on the platform, go to Devices to locate the device swarm containing the vacuum pump. Use the search option on the left to get to the device swarm called Prototyp:

Locate the vacuum pump device in the device swarm Prototyp at https://studio.record-evolution.com/en/falk/swarms/Prototyp/devices.
To build your own swarm, go to Devices and click Add Device Swarm.
A swarm is your basic, compact, fully autonomous IoT device management environment on the Record Evolution platform. A swarm consists of a set of IoT devices, all device and device group settings, as well as the privilege structure specific to the assets of that swarm.
To add a new device, enter your newly created swarm and select New Device from the menu. The first step is to create a virtual device on the platform:

To equip your physical device with the necessary system and configuration for the platform, you need to prepare and set up an individual SD card for that device.
To do that, download the Record Evolution Reflasher. This is our desktop app that enables you to create bootable configured flash drives and is available for Windows, Linux, and macOS. If adding a device for the first time, you will trigger an automatic download of the Reflasher.
This is all you need to get started:
- An internet connection;
- An SD card;
- A device such as Raspberry Pi (or any Docker-capable device);
- A Windows, Linux, or a Mac computer.
Now install the app on your computer and simply follow the instructions to go through the flashing process. Click on Flash / Flash All to continue. The app allows you to flash and configure multiple devices at once:

Once done, remove the SD card from the card reader. Insert the SD card into your device (in this case, the Raspberry Pi 4) and power the device:

Once the device has booted successfully from the flashed SD card, it will try to connect to the platform. Connecting may take several minutes after the very first boot of your device. Go to your swarm and see if the device icon has turned green. If yes, that means your device is online.
On the platform, you can connect to any Docker-capable device running on Linux from any location using a simple secure internet connection. For details on how to connect an IoT device, see here.
To learn more about the Record Evolution Reflasher, the flashing app that allows you to connect to any Docker-capable device, see here.
Building the IoT App
Next, we need an IoT app to tell the pump what to do, observe the pump state, send out warning emails, read out and send the data from the sensors to the platform. To get there, you can actually build your own app in the cloud IDE. Go to App Studio and click on Create an IoT app to start coding.
Within the platform ecosystem, an app is an IoT application that is under development, together with its entire update history. You create apps in the integrated development environment using any programming language.
Also, you can get a publicly available IoT app and use it as an app template to build on, tailor to your needs, and improve. The platform’s App Studio already contains the app Prototyp-Vakuumpumpe:

Click on Develop to access the cloud IDE and view the code:

Alternatively, you can simply go to the IoT app store and use the ready-made app Prototyp-Vakuumpumpe. The app to be installed on the device is already created in the open-access Record Evolution IoT app store here.
This app serves two purposes. It controls the pump setup and observes emergency limits, plus it reads and sends data from the sensors.
Depending on your access privileges, you will be able to either co-develop in the cloud IDE or simply use the ready-made app template without making any changes.
So here is the app that reads out the values of the different sensors attached to the vacuum pump and publishes them to the data pod.

Once published on the IoT app store, the app is ready for installation on any device connected to the platform. You get a small readme file, instructions on how to build the source code and to publish the app: https://studio.record-evolution.com/en/apps
Click on Install and select the IoT device at the pump:

You will be quickly redirected back to your device swarm from where you can manage the settings.
How It All Works Together
Let’s log in and go to the device swarm to check on the vacuum pump. The device icon is on the left-hand side of the screen. If it is glowing green, the device is online.
To install IoT apps on the device, let’s go to the Record Evolution App Store:

Locate the apps you need and click on Install. We install the vacuum pump app and the GPS reader app.
Use the Recently Visited button to quickly get back to the device and see that the apps have been installed on the device.
Now let’s try to turn the device on and off. If there is a GPS sensor on your device, you always know where your machine is.
Also, the collected data can also be sent to the platform where it will be stored in a data pod’s raw table. To do this, go to the data pods.

Locate the data pod that is already collecting the IoT data coming from the vacuum pump. Inside the platform, the incoming data is further processed to show you live characteristic curves in the browser.
Measuring e.g. vibration signals with 40000 Hertz accumulates very large amounts of raw data very quickly (i.e. 40000 rows per second).
You and your team can watch from anywhere at the same time.
All data is stored in an accessible manner for further in-depth analysis using complex signal processing or even sophisticated machine learning. On the platform, different teams can process billions of rows. Also, the data pods come with convenient built-in tools that make it possible to make use of all classic data warehousing functions right in the platform’s data studio. At the same time, there are various services on top of the classic data warehouse, such as built-in data science workbooks with Python, SQL and Markdown cards.
We go into the data pod Vakuumpumpe and start it. Go to the Raw Data panel. Looking at the raw table, you see if measured data is coming in from the vacuum pump:

If the device is too loud, for example, watch what the curves show and intervene if necessary. When the pump motor gets too hot, you can increase the pause times or reduce the target vacuum, and at the same time send an email to the workshop so that they can order spare parts, among other things.
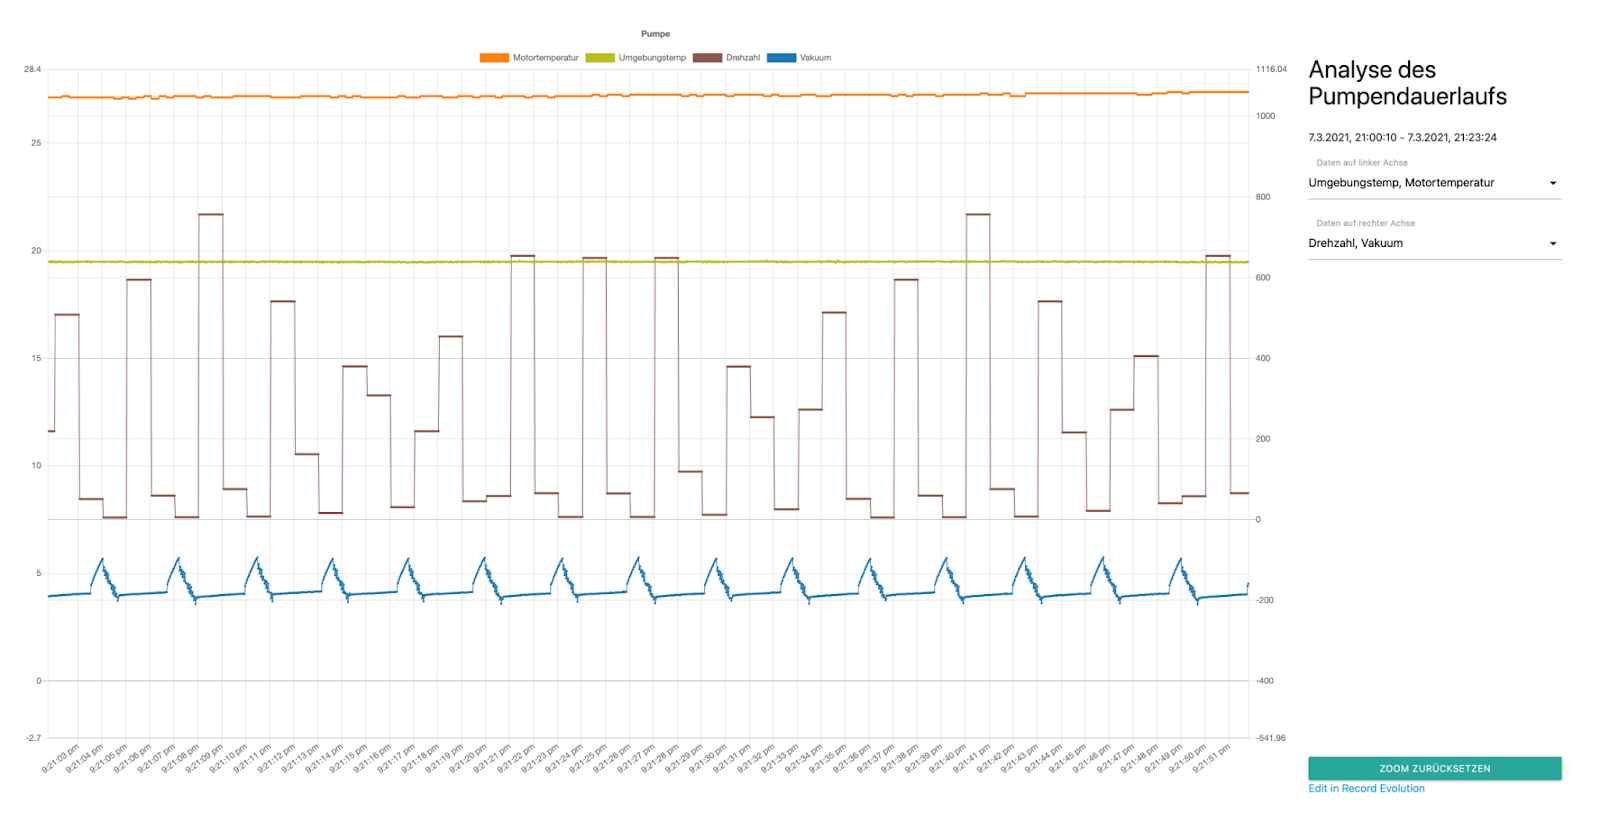
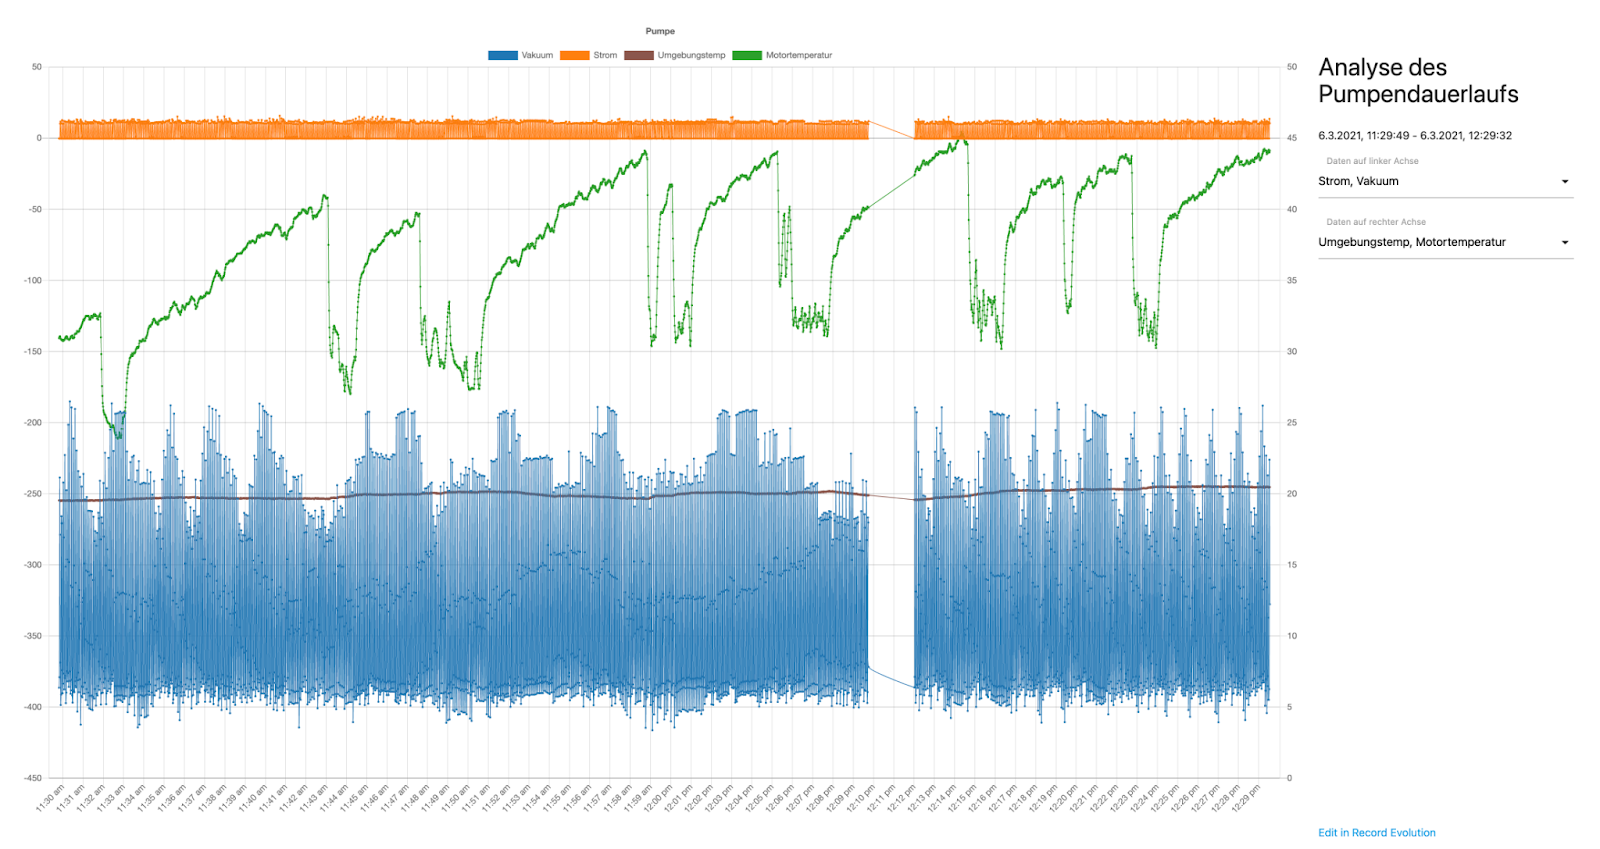
In the Analysis panel of the data pod, you can create infographics using the data from the raw tables. These infographics are mini web applications that can be easily designed to show exactly what you want to observe and can be shared among your team as a convenient directly accessible dashboard:

If a limit is exceeded, the pump stops and the IoT app sends you an email about the error. This way, you can see the reason for the failure, perform the right actions, and restart the pump if necessary.
Conclusion and Outlook
So this is how it all comes together. We built a prototype from scratch, equipped it with sensors measuring different values, and connected it to a Raspberry Pi. From here, it became easy to access the prototype via the Record Evolution platform to read out data and add it to a device swarm from where we could monitor its status.
We installed a data collector app and a GPS reader app from the IoT app store to track the device’s location and to tell the device what data to send to the platform’s data science studio. Once the IoT data was being collected, we could cleanse and transform that data and store it in the form of long-term data histories that lend themselves to further analyses. And finally, we got to visualize some of the incoming measurement data in instant infographics which allowed us to detect some correlations.
And this is only the beginning. Taking it from here, we can go on to develop many different use cases. For example, now it is easy to expand your fleet and scale to multiple vacuum pumps that work simultaneously. All you have to do is flash more Raspberry Pis and add them to your swarm or device group. Stay tuned!
