
In this tutorial, we cover the basic steps of remote IoT app development with the Record Evolution platform. How have we made this possible? Setting up the entire cloud infrastructure needed for remote coding is cumbersome, to say the least. This is why we have developed the Reswarm REagent CLI, allowing you to develop IoT apps remotely on any device connected to the platform. Thanks to the REagent, any device, including laptops, can connect to the Record Evolution IoT Development Studio.
This tutorial shows you how to use the REagent to register any Linux/Mac device to the Record Evolution platform and create and deploy Docker-based applications remotely.
And this is what you need to get started:
- minimum knowledge of Docker
- minimum experience with terminal commands
- a laptop or a desktop computer
What is the REagent and what does it do?
The REagent is a command line interface (CLI) that connects any Linux/Mac device to the Record Evolution IoT Development Studio using a config file. Once the REagent is securely connected to the platform, you can remotely develop IoT apps on your device.
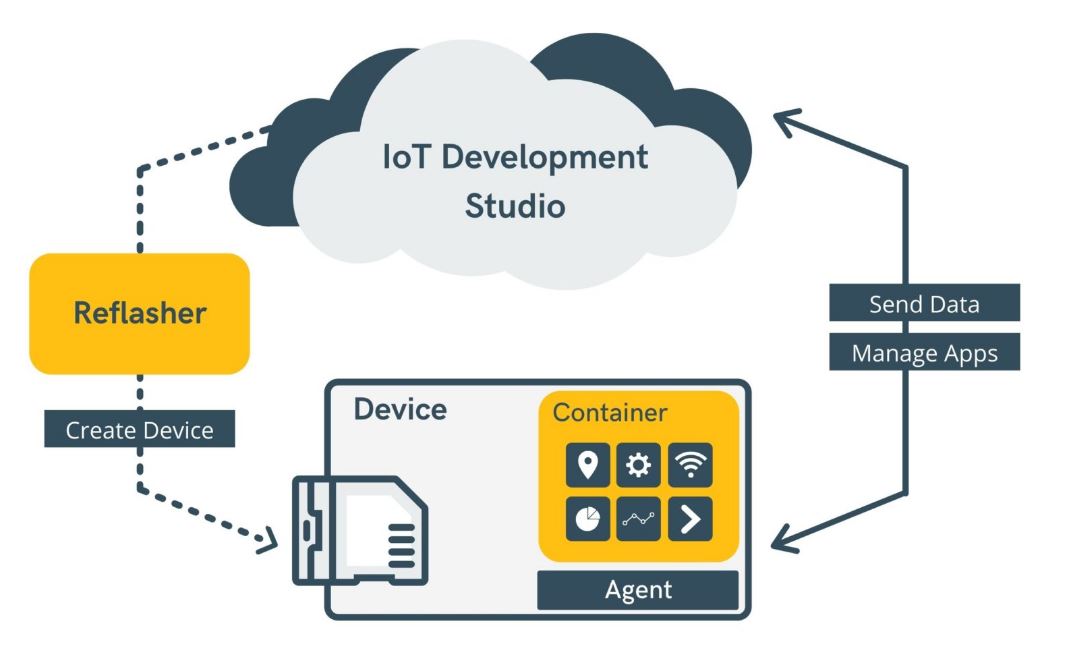
Below is an overview of how it all hangs together in the larger context of the Record Evolution platform. You can observe the interplay between the Reflasher, our custom flashing app allowing you to connect any Docker-capable device to the platform, and the work performed by the agent:
Adding Your Device to the IoT Development Studio: A Step-by-step Guide
In this section, you will learn how to connect your device to the Record Evolution IoT Development Studio, run the REagent, try out or scaffold applications or build a new app right on the platform:
- Install the Reagent on your device
- Create a corresponding virtual device for your physical device
- Connect your device to the platform
- Remotely install a sample app on your device
- Develop a new IoT application remotely.
So let’s go through the steps.
Create free Record Evolution account
Go to the Record Evolution signup page and get your free account. It’s an easy process and no credit card is needed. You can also sign up with your Google or GitHub account:

Install the REagent
Make sure that you have Docker (version>19.*) installed on your device (Linux or MacOS).
Open a terminal on your device and use the following bash one-liner to download and install the REagent for your device:
curl https://storage.googleapis.com/re-agent/install/install_reagent.sh -o install.sh && sudo chmod +x ./install.sh && ./install.sh; rm -rf install.sh
Create a virtual device for your physical device
Now we create a virtual device object in the platform that will represent your physical device. To do that, log into your account to create a device. To do so, follow the steps in the documentation:
- First, go to the Devices section and create a device swarm that will contain your device.
- Second, click on the NEW DEVICE button, fill in the name and leave all other fields blank.
- Third, click on the CREATE DEVICE button and the device config file (.reswarm) will be downloaded to your laptop.
For more details on creating individual devices, see the documentation.
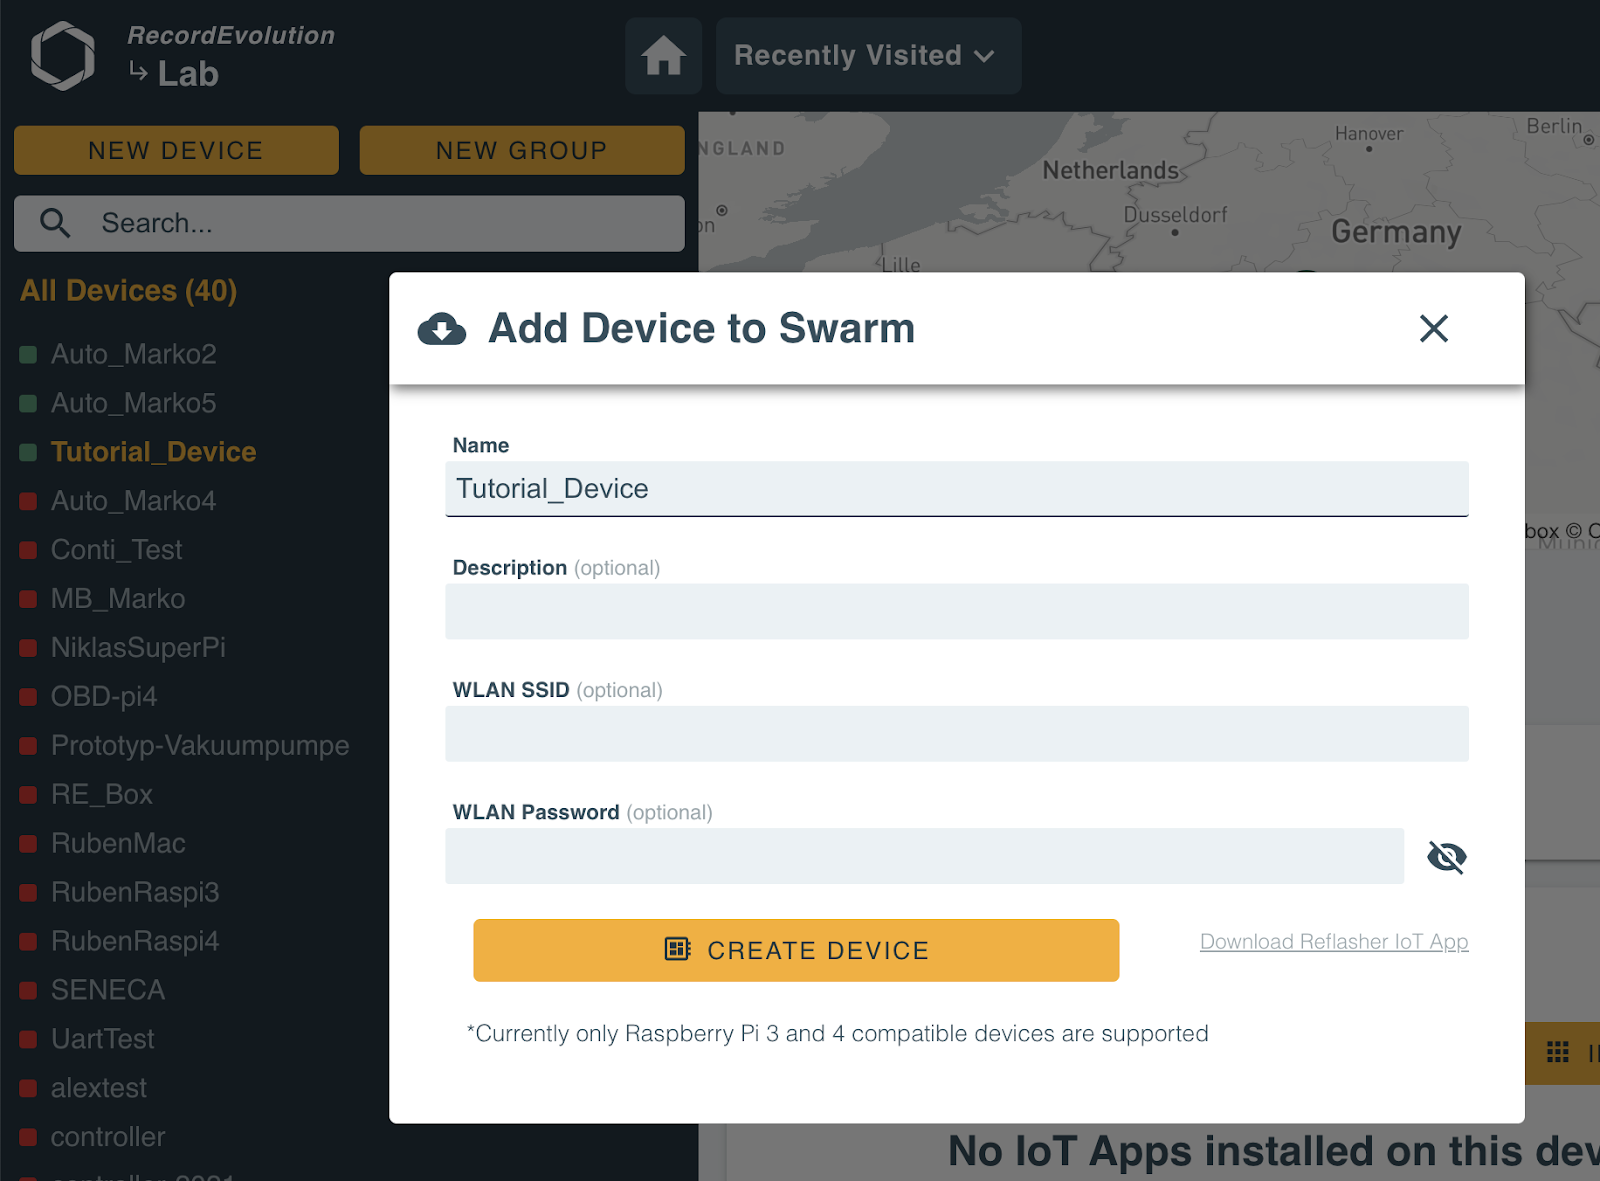
In our example, we called the device “Tutorial_Device” and created it in the swarm “Lab” of the user “RecordEvolution”.
The file that was downloaded is called “RecordEvolution_Lab_Tutorial_Device.reswarm”.
Connect the device to the platform
Now we use the REagent together with the downloaded device config file to connect your device to the Record Evolution Platform. If the device you want to use is different from your laptop, then you need to copy the .reswarm file over to that device.
First, make sure that Docker is running on your IoT device. To connect the device to the platform, run the following command in a terminal on your device:
sudo reagent -update=false -config <your_device_file.reswarm>
You need to enter your sudo password on the device for that to work. If the agent started and connected successfully, you will see a log output like this one:

The process will create some local DBs, which are essential for the reagent to robustly manage the device in bad connectivity scenarios. They can be found in the binary folder of the REagent CLI i.e. for Linux /usr/bin/reagent and for MacOS /usr/local/bin/reagent.
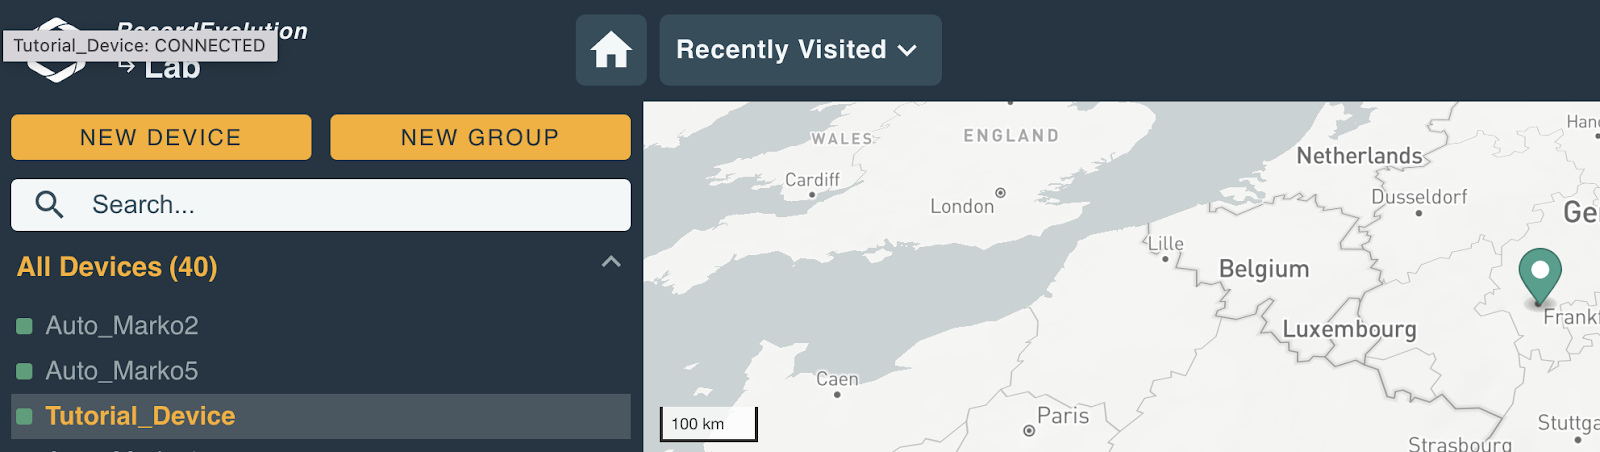
Now go back to the device swarm that you created above. The device “Tutorial_Device” will now show as a green square indicating that it is online. This means the device is available for development.
Install an app remotely
To run apps on your new device, you need your REagent apps folder to be accessible by Docker. Otherwise, running an app will not work. Make sure that, in Docker Desktop for Mac, you have the path ‘/’ or the REagent path /User/reagent/dev/app as a shared resource.

Click the Apply & Restart button and wait for about a minute for Docker Desktop to apply the changes.
It’s now super easy to deploy an app to your newly registered device. Just go to the IoT app store, pick an app and click Install.
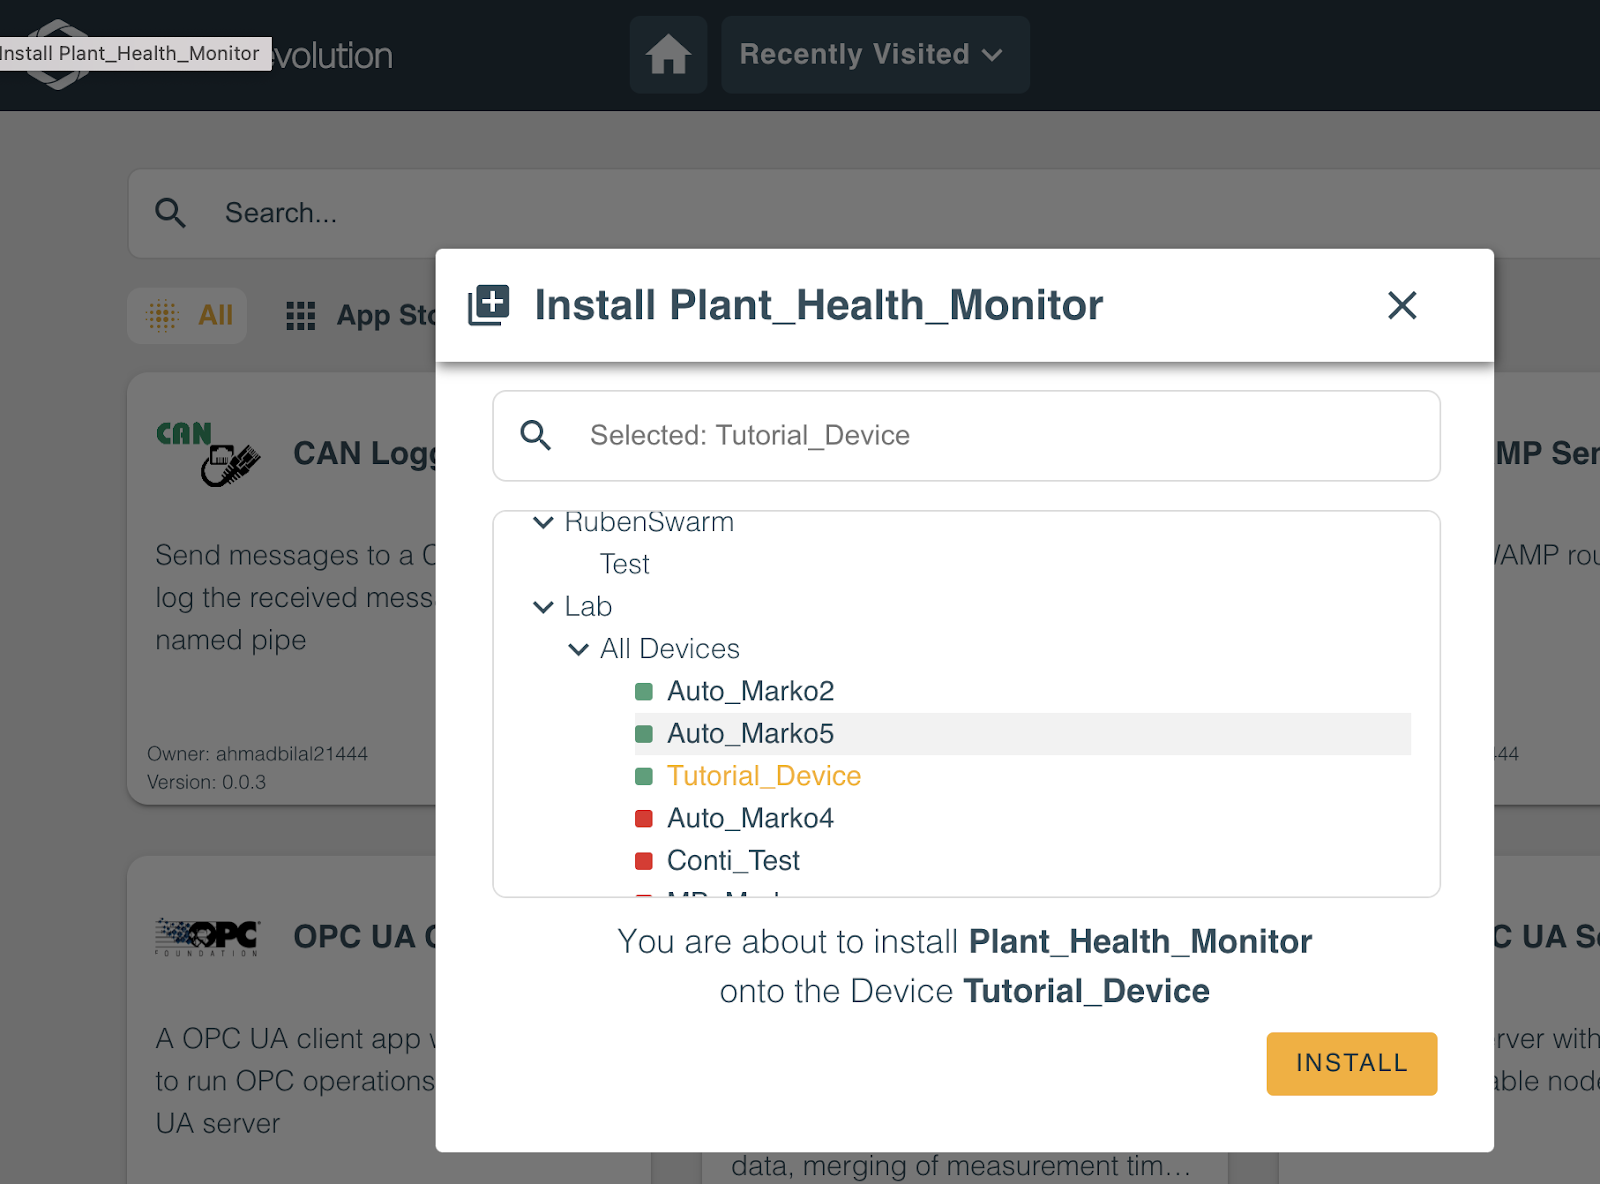
In the upcoming device picker, pick your new device “Tutorial_Device” and click Install. If you go to your device in your swarm, you now see the app downloading. After the download is finished, you can start and stop it remotely.
Create an app remotely
To develop your own IoT apps remotely on your new device, go to the App Studio on the platform. There you simply click CREATE IOT APP and enter a name for your new app. (Note that you cannot change the app name later on.)
A new card will pop up in the app list for your app. Click on Develop on that card and a cloud IDE will open where you can now start developing:

The new app you created already contains some scaffold code that you can change to your liking. In the dropdown in the sidebar, select your new device and start building and running your app remotely on your new device.
Build and then run the app and you will see “Hey Testing Reswarm” at regular intervals in the log window. You can now also open a terminal connecting directly to the running app container of your new device.
Conclusion
In a few simple steps, you can use the Record Evolution cloud infrastructure to create, manage, and deploy IoT apps to your connected devices.
Thanks to the IoT development platform’s app store, you can additionally install apps on your hardware without being an IoT developer and without having IoT expertise. There is a vast range of ready-made apps and app templates, from machine learning algorithms packaged as apps to ready-to-use IoT data collectors that fetch data from sensors. These can be useful for just about any “things application” within your IoT ecosystem, from augmenting your entire existing IoT technology and performing remote monitoring of assets, to building your own home automation system.
You will find more details about the Record Evolution platform in our documentation.
About Record Evolution
We are a data science and IoT team based in Frankfurt, Germany, that helps companies of all sizes innovate at scale. That’s why we’ve developed an easy-to-use industrial IoT platform that enables fast development cycles and allows everyone to benefit from the possibilities of IoT and AI.